|
Blood
Laboratory |
Red cell fragility
>
Procedure |
| |
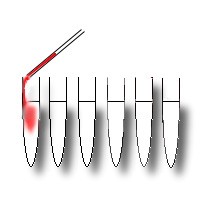
Six labelled centrifuge tubes are prepared containing 10
ml of 0.9%, 0.6%, 0.5%, 0.4%, 0.3% and 0.0% NaCl solutions. |
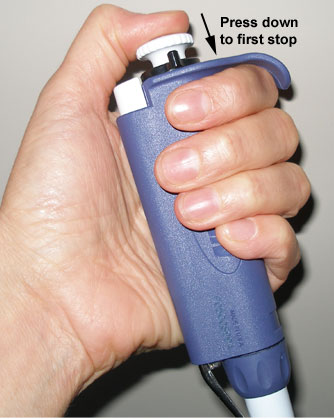
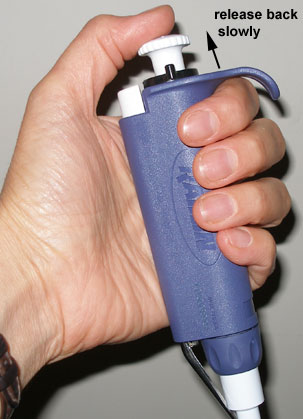
The blood sample is mixed, to obtain a homogeneous suspension of blood cells;
0.1 ml of blood is delivered into each of the 6 centrifuge tubes with an
adjustable pipette on which a disposable tip is inserted. |
 |
|
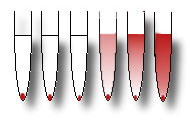
The tubes are capped,
inverted several times, and allowed to stand for 20 minutes. After 20
minutes, all six tubes are centrifuged for 10 minutes at maximal speed. |
|
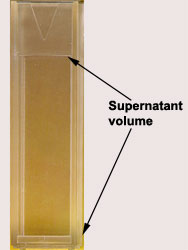
The supernatant and the pellet are now visible. Pasteur
pipettes are used to transfer enough of the supernatant fluid (up to the
mark on the spectrophotometer cuvette) from each
tube into square spectrophotometer cuvettes. |
 |
|
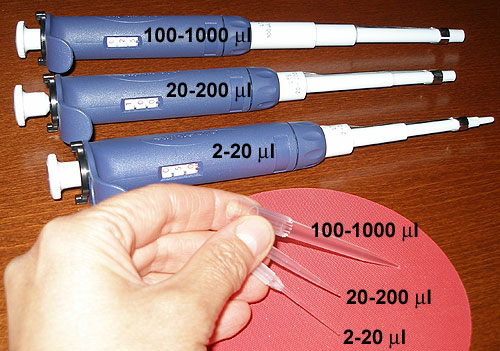
The use of adjustable
pipettes and proper pipetting |
|
 |
|
These expensive instruments are continuously
adjustable pipettes designed to dispense precise volumes of liquid
safely. Each model (see above) cover specific volume ranges. If these
volume ranges are not respected, the fragile volumeter breaks! |
|
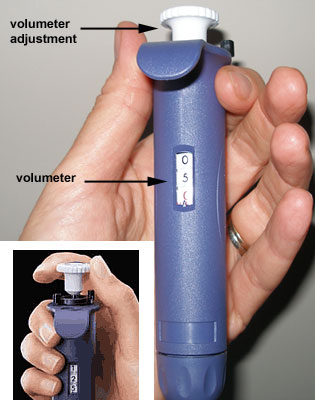
A pipette is equipped with a volumeter
which is used to set the volume. The volume is continuously adjustable
within the volume range for the pipette. The maximum volume for the
pipette is shown on the push-button and corresponds to the model.
The volumeter consists of three number dials
(which are used to set the volume of liquid to be transferred). They are
read from top (most significant digit) to bottom (least significant
digit).
There is also a locking mechanism (black
ring) which prevents accidental change in volume. |
 |
|
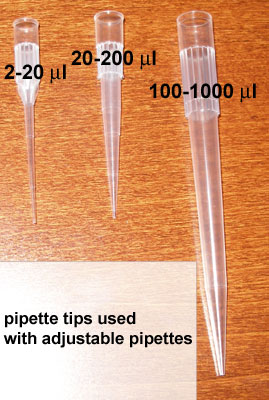
Pipette tip sizes used in the
laboratories |
|
Note the different sizes available for
specific pipette models, you will be using in this laboratory exercise
as well as others requiring precise pipetting. Use the proper tip with
the proper pipette! |
|
Examples of volumeter
adjustments for different pipettes |
 |
| For pipettes with a
specified range of: 2-20
microL
(verify on top of the knob): |
|
|
This reading indicates a volume
setting of: 5 microL
(the red indicates a decimal, so a volume of 5.x
microLl
is possible with this pipette) |
| |
|
| For pipettes with a
specified range of: 20-200 microL
(verify on top of the knob): |
|
|
This reading indicates a volume
setting of: 175
microL
or 0.175 ml |
| |
|
| For pipettes with a
specified range of: 100-1000 microL
(verify on top of the knob): |
|
|
This reading indicates a volume
setting of: 1000
microL
or 1 ml. Notice that there are only 3 dials on this
particular pipette. The topmost digit in red should only read
0 (for volumes under 1 ml) or 1 (for a volume of exactly 1
ml; in such a case, the bottom two dials should all read zero) |
|
|
Pipette specifications, accuracy and
precision It is also important
to use the proper pipette, for the amount of liquid handled because
accuracy and precision must be taken into account.
Accuracy is the degree of closeness of a
measured or calculated quantity to its actual (true) value.
Precision is the degree to which further
measurements or calculations show the same or similar results.
Look at the following table showing the
specifications of different adjustable pipette models. For a given
volume, for different models, notice how accuracy and precision vary.
Which pipette would you choose to
dispense a 10 microL
volume with best accuracy and precision? and to dispense a 20
microL or a
100 microL
volume?
|
Adjustable
range Model |
Volume microL |
Accuracy
|
Precision
|
| microL
+/- |
% |
microL
<= |
% |
|
1-10 microL |
10 |
0.1 |
1.0 |
0.04 |
0.4 |
|
2-20 microL |
10 |
0.15 |
1.5 |
0.05 |
0.5 |
|
2-20 microL |
20 |
0.2 |
1.0 |
0.06 |
0.3 |
|
20-200 microL |
20 |
0.5 |
2.5 |
0.2 |
1.0 |
|
20-200 microL |
100 |
0.8 |
0.8 |
0.25 |
0.25 |
|
100-1000 microL |
100 |
3.0 |
3.0 |
0.6 |
0.6 |
To deliver a
volume of 100
microL
:
when choosing a 20-200 microL
range pipette model, the error is +/- 0.8 microL
which represents 0.8% of the volume (0.8 % deviation from the
desired value). However, if the 100-1000 microL
model is chosen, then the error becomes +/- 3
microL
, that is 3% deviation from the desired value.
|
|
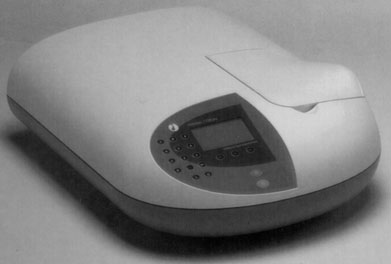
Spectrophotometry
readings |
|
The
spectrophotometer is
prepared. The wavelength is selected for optimum light absorption to
read
540 mu.
How does it work?
Zero OD is set with a cuvette containing distilled water only.
Then, the cuvettes containing the different supernatants are read
sequentially. |
 |
|
 |
|
|
A
spectrophotometer cuvette holding a maximum of about 3 ml. |
|
|
|
To
continue with the measurement of erythrocyte fragility, click here |
|
|
| |
|
|
|
|
|
|
| |
| |
| |
| |
|
| |
| |
| |
|
| |
| |
| |